Johnson Level Aluminum Rafter Angle Square - 7"
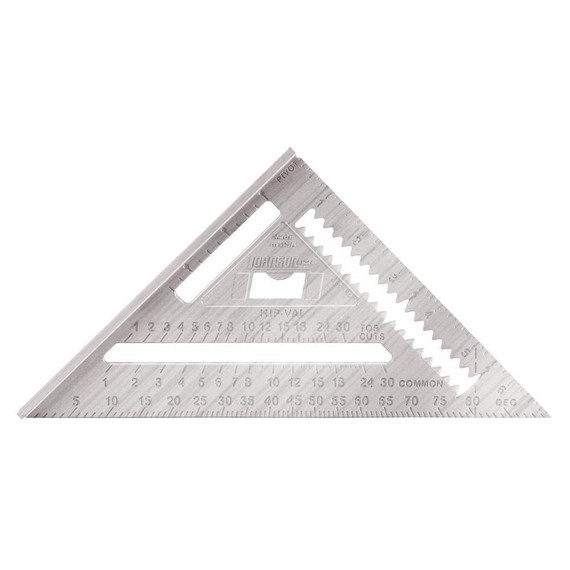
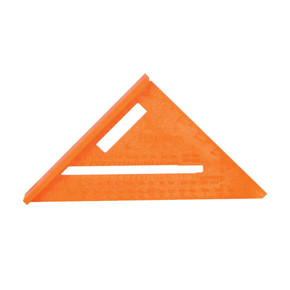
As a saw guide, stair layout tool or rafter tool, Johnson's rafter square will help you get the job done accurately and easily. Its solid aluminum body construction with CNC machined edges provides greater accuracy along with durable chip-resistant coating. Use the scribe notches for marking and ripping lumber and handy markers that measure 2X4 board dimensions of 1-1/2", 3" and 3-1/2". This square also has deep cast-in graduations that will never peel off, wear off, fade or smudge.
Features
- Solid aluminum body with CNC machined edges for greater accuracy and durability
- Permanent graduations and numbers are easy-to-read
- Thick edge is useful as a saw guide
- Continuous scribing notches - Ideal for ripping at 3-1/2" and 5-1/2"
- 2x4 board dimension markers for measuring 1-1/2", 3" and 3-1/2"
- Low-glare, protective powder-coated finish
- Complete instruction manual included with rafter tables
- Integrated bottle opener in the center of the square
- Made in U.S.A.
How to Read a Rafter Angle Square
- Find the lip edge. This edge keeps the rafter angle square from lying flat. Use it as a straight edge
- Locate the hypotenuse, running at a 45°angle from the legs
- Follow the lip and adjacent leg to where they form a 90°angle. This is called the pivot
- Locate the common label along the long inner cutout. This measures pitch (generally used for roof pitch)
- Find the degrees along the hypotenuse. Use this measurement as an alternative to common
How to Use a Rafter Angle Square
- Lay the square on the surface of the material so the lip extends down the long side of the material
- Rotate the lip away from the edge of the material around the pivot. The corner where the hypotenuse and lip meet should move, not the pivot
- Line up the desired angle, as indicated on the hypotenuse, on the same edge as the pivot
- If you are measuring by pitch as opposed to angles, line up the desired pitch, as indicated by the common edge on the same edge as the pivot
- Mark along the outside edge of the rafter angle square for your angled cut
How to Use a Rafter Angle Square for Roof Pitch
- Find a common rafter angled with the pitch of the roof
- Use a spirit level to mark a straight vertical line across the rafter. This is called the plumb line
- Align the lip of the rafter angle square along the plumb line
- Line up the pivot point on the bottom edge of the rafter
- Follow the bottom edge of the rafter to where it meets the common pitch reading
- The corresponding value measures the pitch of the roof
How to Use a Rafter Angle Square for Rafters
- Put the square against the surface of the material you want to use. Mark the location of the diagonal edge. That will create a 45° line.Using the pivot point (the notch on the non-lip leg of the square), adjust the square until the degree gradation you need lines up with the edge. Draw a pencil line along the square on the surface
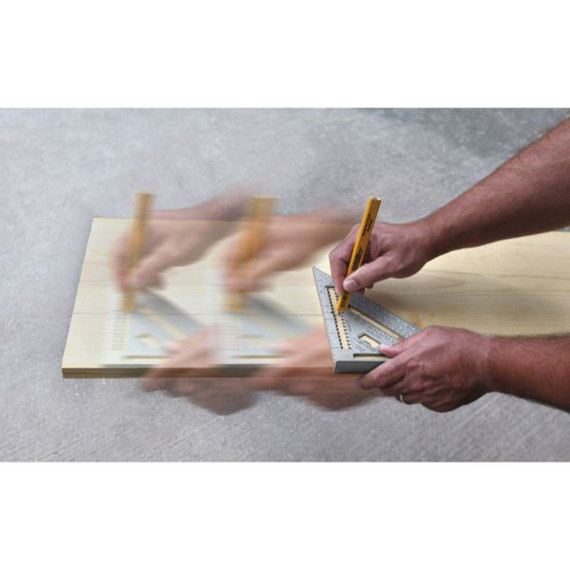
- Press the square against the edge. Place a pencil tip into the notch to measure the number of inches you need. Keep the pencil in the notch and slide the square along the material. You’ll get a straight line parallel to the edge
- Position the square flat on the board you want to cut. Slide the saw shoe against the square. The rafter angle square is thicker so the saw cut will be precise
How to Cut Rafters with a Rafter Angle Square
- Determine the building's width and length and the rafter span in order to evaluate how many rafters are needed. Then determine the pitch. Divide the rafter's span by two to find the rafter's run. As an example, a building that's 24' wide has a rafter run of 12. If your rise is 5, the pitch is 5/12". Spacing the rafters 24" apart, you'll need 15 rafters for a 30' long building
- Mark the top (the plumb) first. Put the pivot point, where the square's straight edge meets the lip side, at the rafter board's top edge. Rotate the square until the correct pitch is in line with the board's edge. Using the opposite side of the square, draw a line down the side of the board. This is your plumb line. After the rafter length is set and cut, make another cut 3/4" from plumb to allow for two-inch ridge board for where rafters meet
- Find the rafter length needed by consulting the rafter table inside of therafter angle square manual. Returning to our example, a 5/12" rafter has a length of 13"
- Find the birdsmouth joint
Application
This Johnny Square is a versatile tool for builders and contractors. Its thick edge is useful as a saw guide - it can be used directly with the saw against the square for cross cuts or angled cuts using the etched protractor scale. It can be used indirectly as well, using the scribing notches to create a saw cut line for rip cuts. The Johnny Square also simplifies stair layout - its integrated distance and angle scales let you quickly and accurately mark your cut lines on your stringers. And, of course, this rafter square has scales for cutting hip, valley and jack rafters.
Specifications
- Size: 7"
- Material: Aluminum
- Finish: Powder Coated
- Warranty: Limited Lifetime Warranty


